Thursday, March 10, 2016

SALSA!!!

This salsa recipe is absolutely perfect for the winter blues, and anytime you have a craving for tomatoes and all things summer and garden-fresh.

I make it as often as I can, and love it more than my luggage.
And I'm pretty sure that once you try it, you will want to join the I LOVE SALSA club as well.
We could make tee-shirts!
Anyway....
This salsa is

  • Simple and quick, meaning within an hour you should be nestled happily in front of your favorite Netflix series with a bowl of chips & salsa.
  • Does not require fresh tomatoes, making it a year round treat.
  • And, can be varied in levels of thick/thin, hot/mild. 

So, what say ye?  Shall we get started?

First things first, gather the following ingredients:

2 (10 oz cans) Rotel tomatoes & green chilies
3 (28 oz cans) Diced tomatoes
1 (28 oz can) Crushed tomatoes
1 Tablespoon chopped jalepenos (jar is fine)
3 bunches Cilantro
1 bunch green onion
2 fresh tomatoes (large)
4 teaspoon salt
2-3 teaspoon pepper
1/2 teaspoon cumin
1/2 teaspoon chili powder
1 1/2 teaspoon sugar
Juice of 3 limes


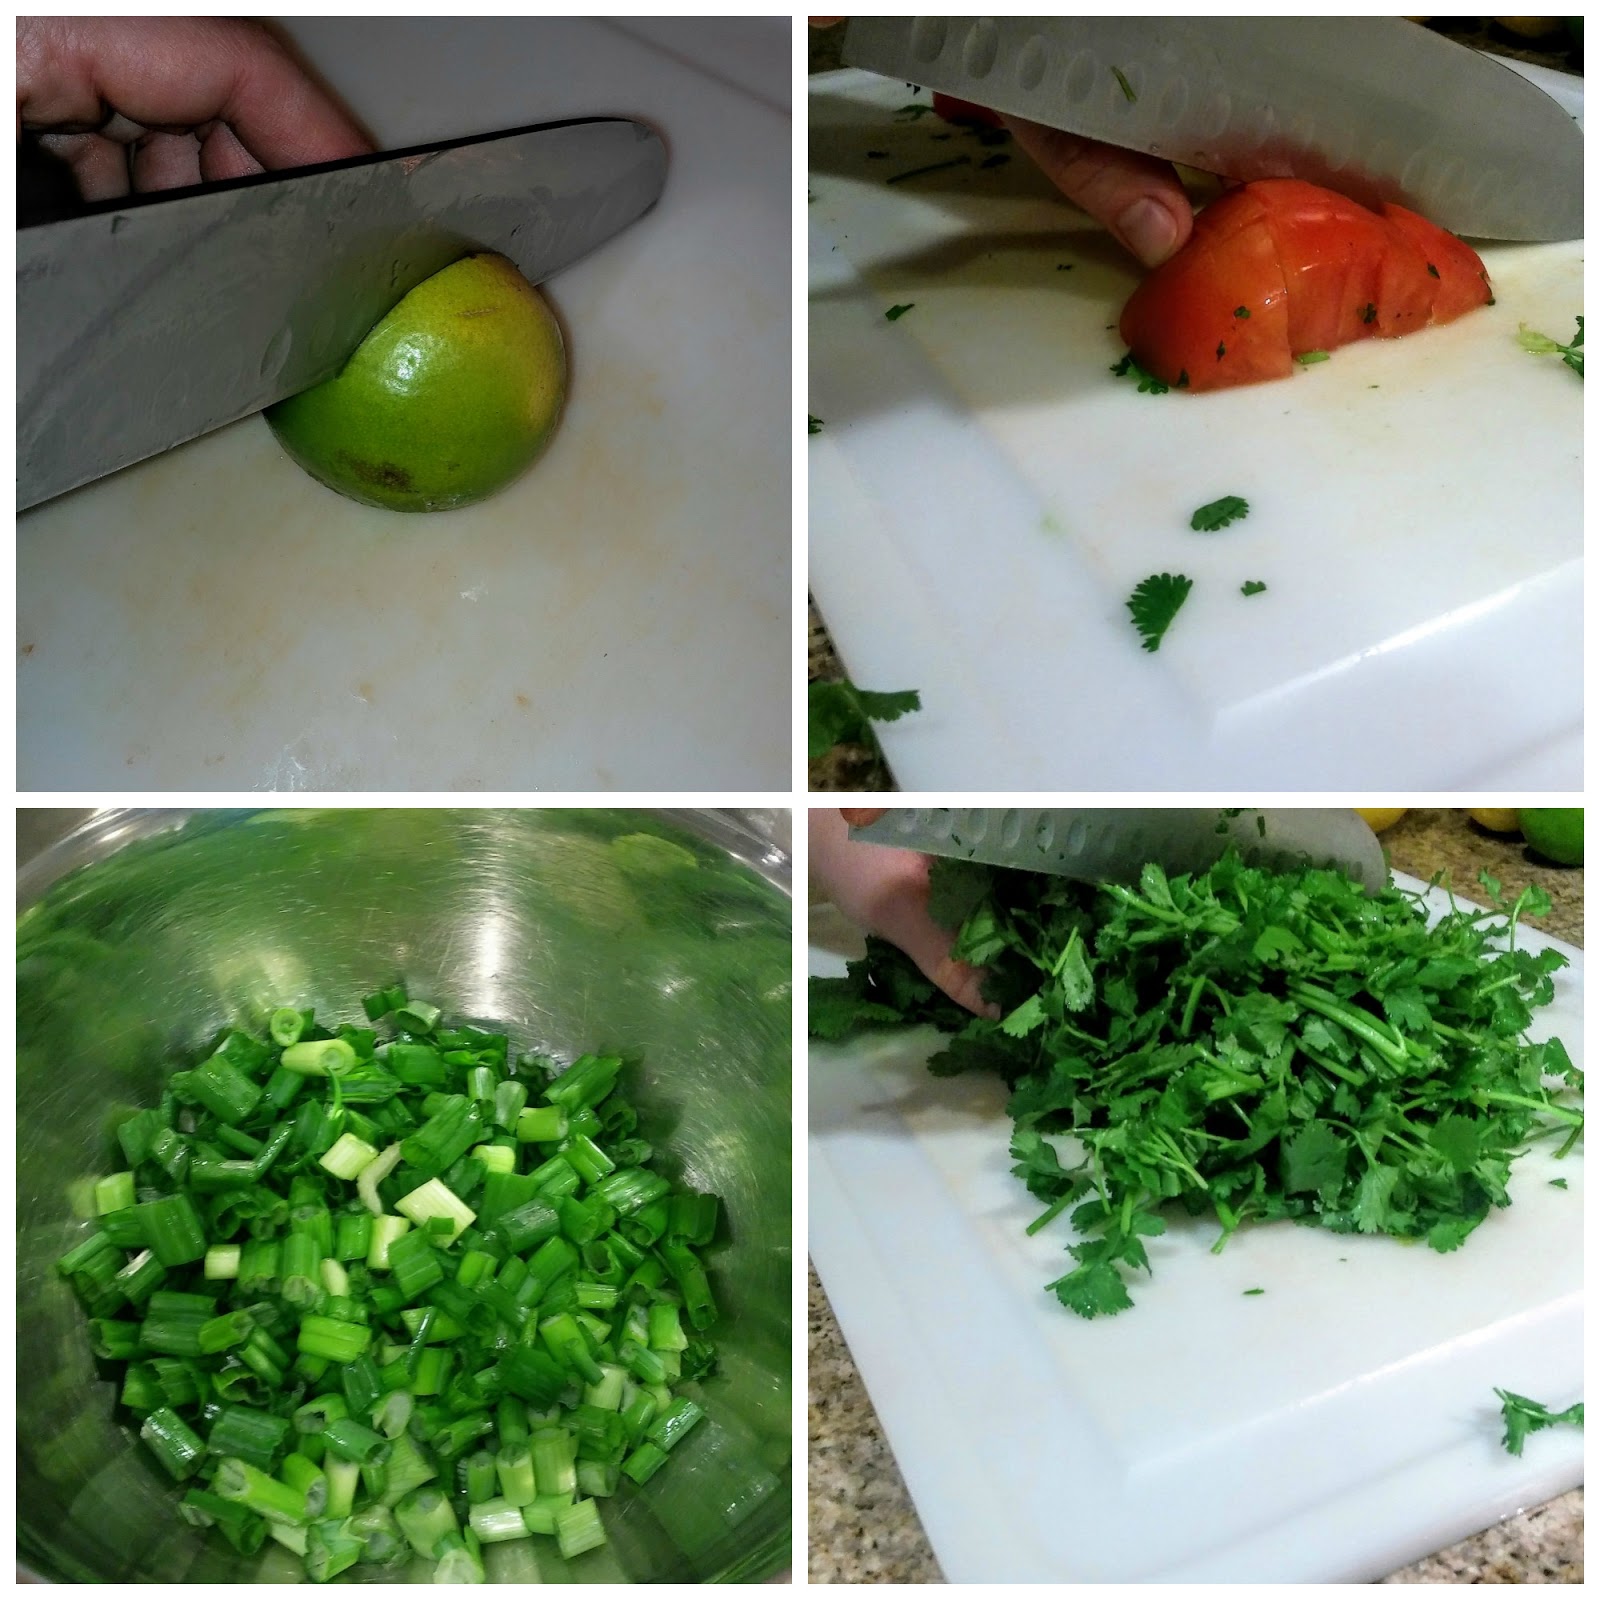
Then begin chopping everything that must be chopped.

Cilantro
Green onion
Tomatoes (2 large)
Slice the limes in half


Set all of your chopped ingredients, with the exception of the limes, in a large bowl.

Next, you want to open up all of the canned ingredients; and decide whether to drain, or not to drain.
It should be noted that the thickness of the salsa will depend on how much liquid you keep vs how much liquid you drain.
Whereas, the chunkiness of the salsa will be determined later in the recipe.
Ok, let me help you out.
If you prefer a very thick salsa, drain the Rotel & the three cans of diced tomatoes.
If you prefer a thinner salsa, do not drain the Rotel or the three cans of diced tomatoes.
If you are somewhere in the middle, drain half.
I can't help you much more than that.
It really is up to you and your personal salsa taste.  If you ask me which I prefer, my answer has to be "yes."  Just yes.
And for this particular time, I drained all but one can.  The salsa was very thick and didn't go quite as far; but you will see....

Now that you have diced what needs to be diced, opened all the cans, and decided whether to drain or not to drain....

Pour all of your Rotel & diced tomatoes (saving the Crushed tomatoes for later) into the bowl with the chopped ingredients.


Mix together and begin spooning the mixture into the food processor.
It will probably take 3 - 4 groupings before you have processed everything.
I also threw the jalapenos in at this point. (Feel free to add more if you like a little extra kick!)

(before food processor had its way)

For each group, pulse your food processor a few times until you have the texture you like.  I generally pulse 5 - 6 times and I pulse some groupings more than others so that my salsa ingredients have a variety of size and texture.
It should be noted that this is the point where you decide the level of chunkiness that your salsa will have.  The more pulsing, the less chunky.  The fewer pulses, the more chunky.
I went with chunky-chunk-chunk this time around.

(post processor)

As you work through each group, move the ingredients from the food processor to a large bowl.
Once all of your pulsed ingredients have been added to the bowl it will look something like this.


Keep in mind that this time I made mine on the very thick/chunky side, and drained all but one of the cans.  So, if yours looks different, it could be because you opted to drain less liquid than I did.

At this point, add the crushed tomatoes, seasonings (chili powder & cumin), and lime juice straight into the bowl and stir.


You can start adding the salt, pepper, & sugar now, but it is better to do it in batches.
You may like less salt than I do, or more or less pepper.
The sugar helps balance out the acidity of the tomatoes and adds a layer of flavor that is very important, so don't be tempted to leave it out; but feel free to add gradually, balancing it with the salt & pepper.
I generally go through about 10 spoons at this point in the recipe.
Taste.
Adjust.
Taste.
Adjust.
Taste.
Adjust.
And so forth and so on....

Once you are finished, call in a hungry kid and ask them to do you a favor and taste test the world's greatest salsa for you.
They will be happy to oblige and you will win brownie points for being cool enough to make your own salsa.


That should do it!
Get Netflix fired up, grab a bag of chips, and be happy.

Until we cook again!
CDawnCooks

Click HERE for printable.


Lemon Herb Roasted Potatoes

If you love potatoes, we are about to be friends.
These potatoes are small bites of heaven, butter and herbs; and they make every day better.

So, without further ado, let's get started, shall we?
PS...link to printable can be found below.

Set your oven to 375 degrees; and gather the following ingredients:

2-3 lbs small golden potatoes (scrubbed clean)
1 medium yellow onion, diced
1 - 3 Tbsp EVOO
Tablespoon or two of butter
Salt to taste (Kosher and/or Himalayan is my fave)
Ground Pepper to taste
1 lemon (if you can get a Meyer lemon, all the better)
1/2 - 1 tsp Srirachi (opt)
1 bunch Green Onion, chopped
Bunch of fresh Parsley, rough chopped
Bunch of fresh Cilantro, rough chopped

Start by washing the potatoes and slicing them into a mixture of halves and quarters, then place them in a large bowl and drizzle with EVOO.


Add salt & pepper to potatoes.


I buy Kosher and Pink Himalayan, and mix them together in a container that I keep close to my heart and stovetop.  You never know when you will need a little salt.
In this instance, I added about a half Tablespoon.
As for the pepper, I use a bit of fresh ground, and then finish up with about a teaspoon of pepper out of the shaker.  I hate to admit to laziness, but these potatoes are just so wonderful, I have no intention of waiting any longer than I have to.  Get yourself some fresh ground in there, and then go for the shaker.  Gotta get these bad boys in the oven.

Next, I add the greens....green onions, about a 1/3 of the fresh, chopped parsley, and about a 1/3 of the fresh, chopped cilantro.


Ooops.  do you see that lemon in the bowl??
That means that I added the lemon juice before the greens.  At least this time.
It really is not an exact science.  I just throw things in there as I grab them off the counter.

But, let's have a picture of the lemon being added, shall we?
Add the juice of half the lemon; and toss that lemon in with the potatoes.  It adds extra flavor and looks pretty.


Time to throw in the diced onions.


Ok.
Srirachi. Use this IF you like heat.  I went heat-less this time; but sometimes I'm in the mood for a little kick, and I'll throw in some Srirachi.  Just about 1/2 a teaspoon.  It adds another layer of loveliness.

Now that all the ingredients are in the bowl, toss with your favorite pair of tons; and pour those golden beauties out onto an ungreased cookie sheet.


Allow to cook for about 30 - 45 min, gently stirring every 10-15 minutes.

When cooking time is complete, potatoes will look slightly browned.

Pull them out and drizzle with remaining lemon juice.


Add a little extra salt & pepper.


Throw on the remaining herbs.
(I should note that this would also be a good time to add that Tablespoon or two of butter.  It will help with the browning.)


Toss to mix in all that goodness.


And place in oven under broiler on Low.

Broil for approximately 10 minutes.  You will need to watch it closely at this point.  It could go much faster than 10 minutes.  It really depends on your oven.

Pull them out of the oven once they are slightly crisp & golden brown.
They should look something like this.  Notice how beautifully golden that lemon is?
Mmmmm.....


Watch for hungry children.
They will go all grabby-grab on ya and eat half the pan before it is even out of the oven.


Allow the remaining potatoes to cool for 10-12 minutes.


Serve to friends and family, or lock the door and eat them all by your happy little self.
No judgement here whichever route you choose.


Until we cook again!

Xoxo

CDawnCooks

Click here for printable


Thursday, March 3, 2016

Tomato Soup

Before I begin, allow me to explain...

A good homemade tomato soup recipe is something that everyone needs in their life; but also something that is unique to each individual chef.  Some prefer it thin, but loaded with invisible bursts of flavor, while others like to see the bold chunks of tomato goodness.  I fall somewhere in the middle, while leaning slightly towards the chunky side.  Sort of like my thighs.

That being said, this recipe is a tad more chunky than I had anticipated when I set out to make it.  Like most of my recipes, it changes a little each time I make it; and nothing is ever set in stone.
For a "printable" of the soup, complete with ingredient list, and notes explaining how to make a "less chunky" version, see link at bottom of page.
  I support diversity in cooking, and aim to please all palates.


Tomato Soup

 Practically anytime I sauté, I begin with the same ingredients.  A little olive oil, a pat of salted butter, a few drops of Srirachi, and some salt & pepper.   

Mmmm….the smell is amazing, and the color becomes this beautiful golden color that is almost mesmerizing.  I have to be very careful not to stand there and stare at it for too long.  
Because butter burns, people.  Remember that and you won't have to wash out your pan and start over.

Ok, so about the Salt & Pepper.  If you have it, use both Kosher and regular Iodized salt.  I like the way both salts cling differently to the food, and can’t imagine my pantry without either one.


Once you have that beautiful golden color simmering on about med - med/high heat, and just as it begins to bubble, throw in those diced onions and allow them to simmer for just a few minutes (3-5 will do)....the goal being to get them to a slightly translucent/golden place without getting them overcooked or burned. 
My apologies for the lack of photo here, by the way.  Just imagine diced onions simmering in butter and olive oil, and you will know what to do.

Now it is time to add those diced tomatoes and stir them around.  They should be very happy in there with all those golden, buttery onions.  Who wouldn't be?


Once the tomatoes and onions have had a few minutes to get acquainted, it might be time to add a splash or two of white wine ( you could also use sherry.  Sherry is VERY good in this soup, but white wine is what I had).  
I also use the wine/sherry to de-glaze the pot just a bit at this point.  All of that simmering and getting acquainted can sometimes cause some sticking to the bottom of the pan.
So toss in a little of the alcohol of your choice and make sure you scrape up any delicious bits on the bottom of the pan.


Allow this mixture to simmer just a bit so that the alcohol will reduce; and then add the can of crushed tomatoes.


Bring to a beautiful, gentle boil, and allow to simmer for just a few minutes (when I say "few", I generally mean about 3ish).

See??
Isn't that boil BEAUTIFUL?


Mmmmmmm.....

Now for the Chicken Stock.  Add it and allow the gentle boil to continue to simmer for a "few".


Next up is the Parmesan Cheese.
Use whichever you have, grated or shredded, but please don't leave it out.
However, I would start slowly with it, adding about 1/3 of it at a time, and allowing it to gradually melt into the soup.


Once the parmesan has melted, it is time to add the seasonings.


And the Half & Half.


Mmmmmmmmm....How beautiful is this?  Your life is almost complete, my friend.
Hang in there and have a spoon ready, because it is about to get goooood.

Ok....
So at this point, I allow the soup to simmer just a bit (another term for 3ish minutes).
Then I usually feel that it is too thin, and pull out a can of tomato paste.


Paste will thicken the soup some, but not too much; however, don't feel the need to add the entire can.  Start out with a spoonful, and go from there. You won't be sorry.

Once the paste has been added, and a proper amount of simmering has happened for a few-ish minutes ( I know.  I like simmering).....
you can begin the taste testing.
And like with most tomato based dishes, sugar is needed.
Add about a teaspoon, and then taste test again.
You will probably feel the need to add some extra Salt & Pepper at this point, and possibly a tad more sugar...depending on personal taste.

I wish I could tell you exactly how much of these final ingredients to add, but it is strictly up to personal preference.
Get it how you like it, and throw in the final touch.
Freshly chopped parsley.

Allow to simmer....but you knew that, didn't you?

And taste.

Is it perfect?

Are you happy?

If so, serve with a slice of broiled french bread, or a toasted whole wheat bun you found in the bread box.

Top with cheese and live happily ever after, while watching Parenthood on Netflix.

Printable Tomato Soup recipe HERE.


Sunday, June 23, 2013

so there is this coffee house...


There is this coffee house.
It beats all other coffee houses I have visited in a very, very long time.
Hands down.

If you live in the T-Town area, or are ever driving through.
Do not pass Go, do not collect $200.
Just go straight to Topeca.
Downtown. Next to The Mayo hotel.


Sit down.
Relax.
And enjoy a Cafe Vanilla Latte.


You will thank me. You will want to be my BFF for telling you about this place.
You will decide to never leave Tulsa as long as you live, so that you no longer have to order Topeca online and can forever be close to this delicious brew.
And you will be happy.
You are welcome.

Thursday, June 6, 2013

An Irish pub in the midwest....

In honor of the first post for the Foodie section of this blog, I asked the husband to take me somewhere I'd never been.
He chose McNellie's, an Irish pub at 1st & Elgin, for all you fellow T-Towners.
If you've ever been, you know what I mean when I say that just walking up to the place is an experience.


Perhaps it is something about random welding signs and bikes parked alongside the outside walls of a building that get me.
The entire scene suggests that casual every day life just might be going on here.
In addition, a sense of nostalgia for an era that can only be remembered, is felt with each step closer to the establishment.
And this is only the outside of the restaurant.


Upon entering the pub, a plethora of fragrant smells, rich decor, and friendly faces is immediately in abundance.
Even the guests seemed in the genuine spirit of the pub.


Like Matt, who is a member of the City of Tulsa Pipes & Drums and who willingly agreed to have his picture taken for this post. He also invited me to a picnic this Saturday at Zink park where I can get more than my fair share of men in kilts.
Ummm, yes.
As long as I can bring my camera, Matt?


Not to mention the fish and chips that made my taste buds sing.
And the cajun meatloaf that lit them up ever so slightly.
It was Irish heaven on about three different plates.


So when you try out McNellie's on 1st & Elgin,
or the one in OKC, or Norman,
 remember to do the following:

Come hungry.
Be prepared to make new friends.
And see if you can spot the best waitress in the world.
Her name is Christine and I convinced her to let me take her picture near the rich wooden staircase that centerpieces the pub beautifully.


Tell me you don't want to go see that smile sometime this weekend.

Thank you  for an amazing meal, McNellie's and for an authentic Irish pub experience.
Thank you, Christine, for the prompt and friendly service. And for reminding me to eat my veggies.
And, thank you, Matt, for inviting me to a picnic only moments after we'd met.
I just love picnics.
And I'll be looking for you and your kilt!

xoxo